Кратак резиме: Да бисте изабрали праву торбу за бицикл за путовање на посао, почните са својим профилом путовања (раздаљина, вибрације на путу, трансфери), а затим ускладите тип торбе са оним што носите (лаптоп, комплет за теретану, намирнице). Одржавајте стабилно руковање помоћу једноставних правила за оптерећење: управљач 1–3 кг, рам 1–4 кг, седло 0,5–2 кг, торбе 4–12 кг укупно. Дајте приоритет квалитету израде тамо где путници заправо ломе торбе – хардвер за монтирање, доње углове и интерфејсе за затварање – користећи практичне спецификације (420Д–600Д тканине, издржљиве ламинације, ојачане зоне хабања). Завршите брзом провером реалности: тестом љуљања под оптерећењем, прегледом током недеље коришћења и основним тестом воде да бисте потврдили да торба остаје тиха, стабилна и поуздана у свакодневном саобраћају и временским приликама.
Куповина а торба за бицикл за путовање на посао звучи једноставно док то не урадите две недеље и схватите да торба није проблем - ваша рутина јесте. „Права“ поставка за путнике је она која вам омогућава да се крећете кроз саобраћај, степенице, временске прилике и живот у канцеларији без препакивања, знојења кроз кошуљу или борбе на сваком ћошку. Овај водич је направљен као алат за доношење одлука: дефинишите свој профил путовања на посао, ускладите тип торбе са оним што носите, а затим закључајте стабилност, удобност, издржљивост и поузданост у свим временским условима помоћу мерљивих правила (прагови килограма, спецификације материјала и методе испитивања).
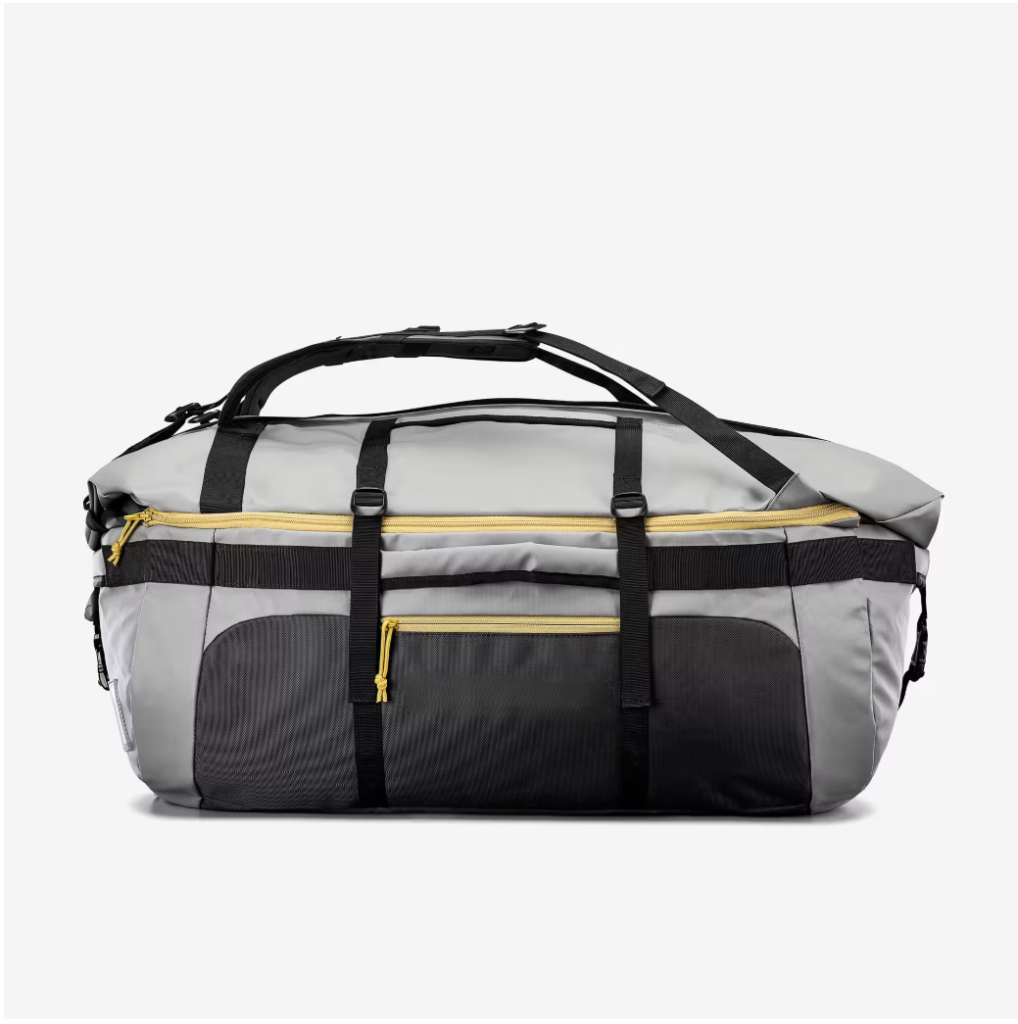
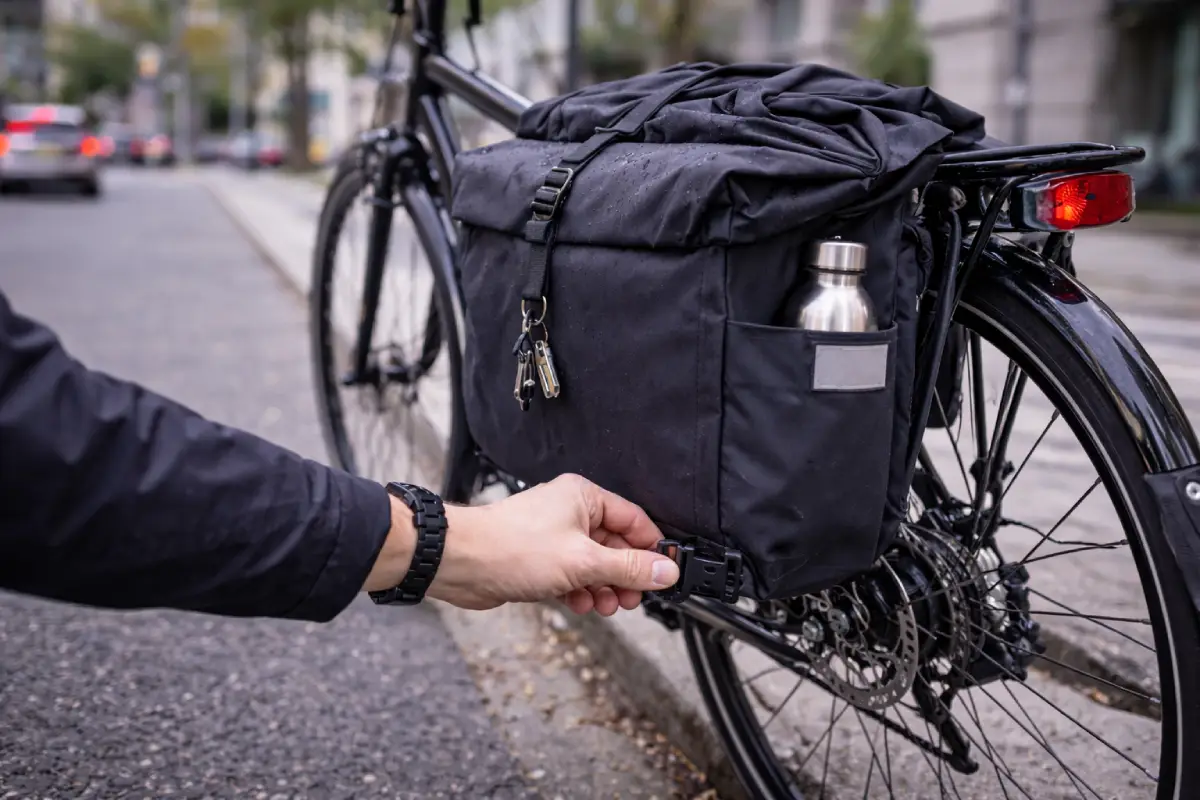
Практична торба за бицикл за путовање на посао: једна водоотпорна задња торба на сталку за стабилно свакодневно ношење у граду.
Корак 1: Дефинишите свој профил путовања на посао
Раздаљина и временски опсег (шта се мења и зашто)
Удаљеност коју возите утиче на оно што прво поквари: удобност, стабилност или издржљивост.
Ако сте испод 5 км, брзина приступа је најважнија – добијање кључева, значке и телефона без распакивања. За 5-15 км, приметићете постављање тежине и управљање знојем. Преко 15 км, стабилност и дуготрајна издржљивост постају одлучујући фактори јер вибрације и поновљена употреба кажњавају слаб хардвер и танке тканине.
Практично правило: када је ваше дневно ношење константно изнад 6–8 кг (лаптоп + брава + одећа), померање тежине са леђа на бицикл обично побољшава удобност и контролу.
Површина руте и вибрације (глатки пут наспрам разбијених улица)
Груби плочник, рупе и падови ивичњака су тест стреса. Вибрације полако попуштају носаче, трљају премазе и убрзавају хабање шавова. Чак и „водоотпорне“ торбе покваре рано ако се стално микро-тестеришу на шину или анкер за траке.
Ако је ваша рута груба, дајте приоритет:
-
појачане зоне хабања (доњи углови, област монтажне плоче)
-
стабилна монтажа (мање звецкања = мање хабања)
-
тканине у опсегу 420Д–600Д (или чвршће) са издржљивим премазима
Превоз тешка путовања (степенице, капије метроа, канцеларијски лифтови)
Ако ваше путовање на посао укључује возове, степенице и уске предворје, најбоља торба на свету на свету је бескорисна ако је досадно носити бицикл. Овде су системи за брзо отпуштање и удобне ручке важнији од капацитета.
Ако користите мешовити превоз, циљајте на торбу са „два режима”: стабилна на бициклу, лака у руци. Ваш будући ја ће вам се захвалити на првом степеништу.
Корак 2: Ускладите врсту торбе са оним што носите сваки дан
Путници на првом месту на лаптопу (заштита електронике и ризик од удара)
Ако ваше свакодневно ношење укључује лаптоп, штитите се од три непријатеља: удара, савијања и влаге. Рукав помаже, али структура је важнија - торбе које држе облик спречавају ударце у угловима када их спустите.
Потражите:
-
фирма задњи панел или унутрашњег оквирног листа
-
навлака за лаптоп подигнута од дна за 20–30 мм (тако да се пад ивичњака не преноси директно)
-
стабилна монтажа која спречава бочно клизање
Ово је место где многи јахачи посебно траже најбоље торба за бицикл за путовање са лаптопом јер „велика торба“ није аутоматски „сигурна торба“.
Теретана + канцеларијска комбинација (мокро/суво одвајање)
Ако носите знојаву одећу, посебан одељак (или уклоњиви уложак) је вреднији од додатних џепова. Контрола мириса је углавном проток ваздуха плус изолација, а не маркетиншки називи тканина.
Једноставан систем који ради:
-
главни одељак: лаптоп + документи
-
секундарна област: ципеле или одећа за теретану у торбици која се може прати
-
мали џеп: тоалетни прибор за спречавање просипања
Путници у продавницама (стабилност запремине)
Намирнице стварају променљива оптерећења. Циљ је зауставити „прскање торбе“, због чега се руковање чини нестабилним – посебно у саобраћају. Кутијаста торба или структурирани хибрид корпе и торбе има боље резултате од меке вреће.
Правило: ако редовно носите 6–10 кг намирница, користите терет који се монтира на бицикл (сталак + кофер) уместо ранац.
Минималистички путници (мала торба која вас никада не нервира)
Ако носите само основне ствари, избегавајте превелике торбе које вас маме да препакујете. Мала торба за управљач за предмете који се брзо приступају плус компактна задња торба (или танак ранац) могу бити слатко место.
Корак 3: Правила постављања оптерећења и стабилности
Где тежина треба да живи на бициклу („мапа путника“)
Бицикл има стабилне зоне и трзаве зоне. Ставите густе предмете ниско и централно кад год је то могуће. Ставите предмете за брзи приступ тамо где можете да их досегнете без скидања гимнастике.
Ево практичне мапе оптерећења са праговима прилагођеним путницима:
| Локација торбе | Најбоље за | Типично стабилно оптерећење | Изнад овога, проблеми се повећавају |
| Управљач | брз приступ (телефон, грицкалице, рукавице) | 1–3 кг | 3–5 кг (управљање је тешко) |
| Оквир (врх/троугао) | густи предмети (брава, алати, повер банк) | 1–4 кг | 4–6 кг (проблеми приањања/зазора) |
| Саддле | комплет за хитне случајеве, цев, мини алати | 0,5–2 кг | 2–4 кг (љуљање/трљање) |
| Задњи носач + корпе | главно оптерећење на посао | 4–12 кг укупно | 12–18 кг (напрезање сталка/куке) |
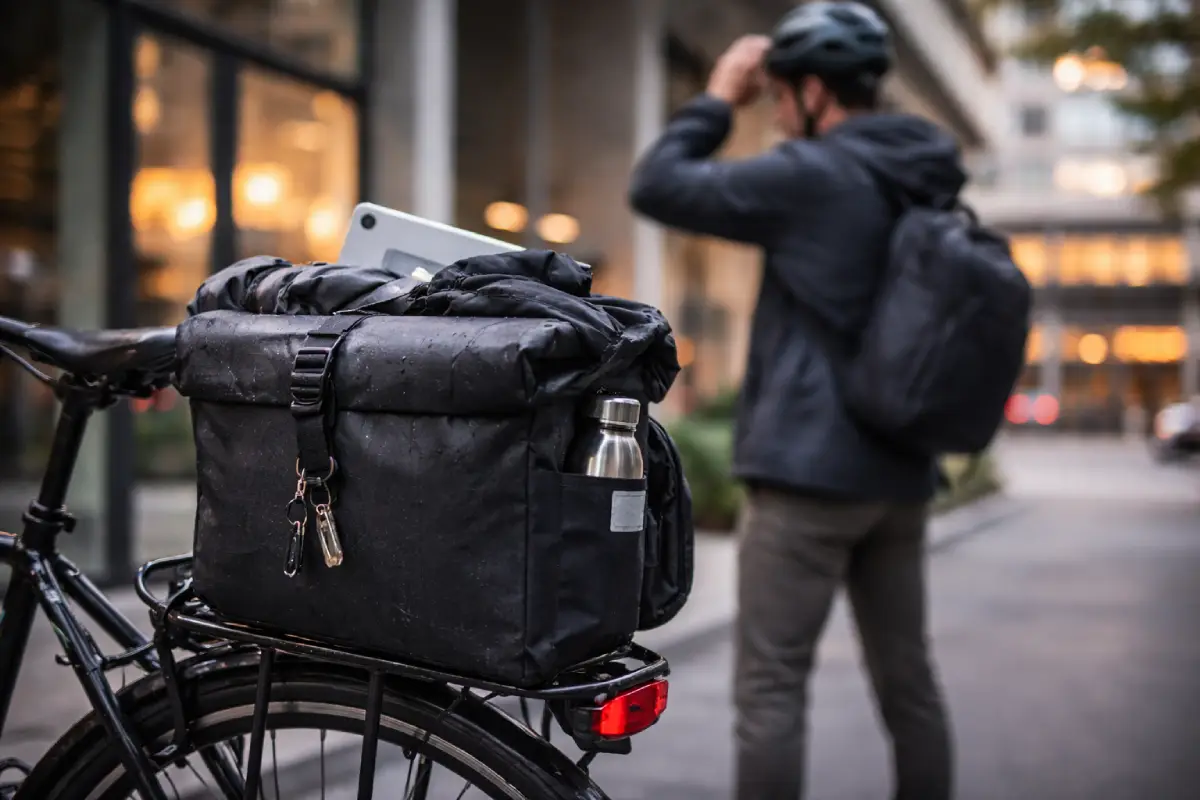
Ово је разлог зашто ковчези за бицикле за путовање на посао су толико популарни: одржавају ниску тежину и смањују умор током дужих дана.
Проблеми са стабилношћу које можете осетити (и зашто су важни)
Сваи није само досадан – то је проблем сигурности и издржљивости. Када се торба заљуља, она:
Ако сте икада осетили да бицикл „маше репом“ у бочном ветру или грубим скретањима, искусили сте зашто торба за бицикл против љуљања није опционо за већа дневна оптерећења.
Размак пете и пристајање на сталку (тихи прекидач)
Многи путници након куповине открију штрајк петом. Ако вам пета закачи кофер при сваком потезу педале, брзо ћете мрзети живот.
Практичне провере уклапања:
-
ставите кофер мало уназад (ако сталак дозвољава)
-
изаберите тање торбе ако је ваш угао стопала широк
-
држите најширу тачку торбе изнад путање пете
Корак 4: Механика удобности и ношења
Зашто се истих 8 кг осећа другачије
8 кг на леђима није исто што и 8 кг на бициклу. На вашем телу, тежина повећава топлоту, зној и напрезање рамена. На бициклу, тежина мења руковање, али смањује замор тела - ако је правилно монтирана.
Право посматрање путника:
-
Оптерећење ранца: више зноја, више замора горњих леђа, али веома згодно ван бицикла
-
Оптерећење пртљажника: мање зноја, лакше дисање, боља удобност током 20-40 минута, али захтева дисциплину на носачу/монтажи
Ако је у вашем граду вруће или је ваше путовање на посао дуже од 20 минута, померање 6–10 кг са леђа често је као побољшање плућа, а не пртљага.
Оптерећење тела наспрам оптерећења бицикла (практично правило одлуке)
-
Ако већину дана носите испод 4 кг: ранац или мала хибридна торба је у реду
-
Ако носите 5–8 кг дневно: размислите о томе да део тога преместите на бицикл
-
Ако носите 8–12 кг: кофери или системи засновани на регалу обично побеђују за удобност и стабилност

Стабилно ношење задњег носача смањује љуљање - против љуљања торба за бицикл подешавање одржава оптерећење током путовања на посао предвидљивим у саобраћају.
Саобраћајна стварност: толеранција стабилности је лична
Неки возачи могу толерисати мало љуљање. Други то одмах осете и почну да преиспитују своје одлуке на сваком углу. Ако сте други тип (без просуђивања - многи од нас јесу), рано дајте приоритет стабилности монтаже.
Корак 5: Материјали и квалитет израде који одлучују о животном веку
Спецификације тканине које су важне (Дениер и издржљивост у стварном свету)
Дениер је користан траг, а не гаранција. Уобичајени опсези приградских возила:
-
210Д–420Д: лакши, потребно је појачање
-
420Д–600Д: уравнотежен за свакодневна путовања
-
900Д+: тешка оптерећења осећај, често се користи на абразивним плочама
За путовање на посао, 420Д–600Д са добрим ојачањем обично даје најбољу равнотежу између издржљивости и тежине.
Премази и ламинације (ПУ вс ТПУ вс ПВЦ)
Систем премаза утиче на водоотпорну поузданост и дуготрајно старење.
| Тип премаза | Типичан осећај | Трајност | Напомене за путнике |
| ПУ премаз | флексибилан | средње | добра вредност; квалитет много варира |
| ТПУ ламинација | робустан, глатки | висока | често боља дуготрајна хидроизолација |
| ПВЦ слојеви | веома тврд | висока | тежи, мање флексибилан |
Ако је киша честа, а водоотпорна торба за приградски бицикл подешавање се више ослања на квалитет шавова и затварања него само на тканину—али квалитет ламинације чини „сезону 1“ и „сезону 3“ веома различитим.
Хардвер и делови за монтажу (где „јефтино“ не успе рано)
Већина кварова у торби су кварови на хардверу: климање куке, кидање каиша, пуцање копче или отпуштање плоча за монтирање. Вибрације + песка је немилосрдна.
Ако процењујете торбе за масовну куповину, овде су термини попут произвођач торби за бицикле, фабрика торби за бицикле, и торбе за бицикле на велико постати смислен—доследан квалитет хардвера је производна дисциплина, а не срећа.
Корак 6: Организација и приступ за дневну ефикасност
Правило 30 секунди (дизајнирајте свој приступни ритам)
Путничка торба би требало да вам омогући да ово урадите за мање од 30 секунди:
-
зграби кључеве/значку
-
приступите телефону или слушалицама
-
повуците слој за кишу или рукавице
-
отворите главни одељак без бацања свега
Ако вас торба приморава да распакујете слојеве само да бисте дошли до основних ствари, на крају ће бити замењена - обично уз благу огорченост.
Џепна логика која функционише (једноставна, није мучна)
Поуздан распоред:
-
горњи/спољни џеп: кључеви, транзитна картица, ситнице
-
главни одељак: лаптоп + документи (заштићени)
-
секундарно: одећа или ручак
-
мали запечаћени џеп: течности (тако да не могу све да униште)
Избор затварања (брзина наспрам поузданости)
-
Ролл-топ: спорији приступ, већа временска поузданост
-
Затварач: брз приступ, зависи од дизајна и чистоће
-
Преклоп + копча: пристојан баланс за многе путнике
У интензивној свакодневној употреби, затварачи се не односе само на временске прилике – већ на то колико често можете да их отворите, а да не узнемиравате себе.
Реализам против крађе (шта помаже, а шта не)
Ниједна торба није „отпорна на крађу“. Али функције против крађе прилагођене путницима могу смањити случајни ризик:
-
скривени рајсфершлуси или гараже са затварачем
-
суптилно брендирање
-
унутрашњи џепови за пасош/новчаник
-
петље за закључавање (корисно у кафићима и кратким заустављањима)
Најбоља карактеристика против крађе је и даље понашање: не остављајте торбу на бициклу напољу цео дан, осим ако не желите да је донирате граду.
Корак 7: Модул путовања по свим временским условима (киша, зима, лето, видљивост)
Киша: спреј је важнији од „интензитета кише“
За путовање на посао, спреј за точкове је главни извор воде. Зато су задњим сандуцима потребни ојачани доњи панели и поуздани затварачи. Ако ваша рута траје 20-40 минута по сталној киши, отвор са рол-топом или добро заштићени отвор је обично сигурнији избор.
Зима: употребљивост у рукавицама и корозија соли
Током зимског путовања на посао, ваша торба треба:
-
затварачи које можете радити у рукавицама
-
хардвер који се не хвата од соли и прљавштине
-
тканине које се не укрућују претерано у хладним условима
Патентни затварачи могу да се замрзну или постану крути када се зрна и хладно споје. Копче могу постати клизаве. Тестирајте свој метод затварања рукавицама - озбиљно.
Лето: управљање знојем и контрола мириса
Ако летите носите ранац, зној постаје главни проблем. Ношење на бициклу драматично смањује зној. Ако морате да користите ранац, дајте предност прозрачним задњим панелима и држите терет лакшим (испод ~5–6 кг ако је могуће).
Разматрања о видљивости и „практичној усклађености“.
Многи региони имају захтеве или снажне препоруке у вези са осветљењем и рефлекторима за бицикле. Торбе могу случајно блокирати задња светла или рефлекторе, посебно када су потпуно напуњене.
Добра радна пракса:
-
нека задња светла буду видљива отпозади (торбе не би требало да их покривају)
-
додајте рефлектирајуће елементе који остају видљиви чак и када је торба пуна
-
размислите како торба изгледа са стране ноћу
Ако је видљивост главни део вашег путовања на посао (рана јутра, кишне вечери), рефлектујућа торба за путнички бицикл није избор стила - то је функционално смањење ризика.
Корак 8: Купујте са поверењем (контролна листа која спречава „другу куповину“)
Контролна листа за уклапање (пре него што се обавежете)
-
Да ли торба одговара ширини сталка и облику шине?
-
Да ли имате зазор док педалирате?
-
Можете ли га брзо уклонити за транзит или канцеларијски транспорт?
-
Да ли је стабилан када је оптерећен вашом стварном дневном тежином (а не масном тежином)?
Контролна листа издржљивости (шта да проверите)
-
Ојачани доњи углови и зоне монтажне плоче
-
Јаки шавови или запечаћени шавови где је потребно
-
Хардвер који делује чврсто и не звецка
-
Дебљина тканине прикладна за вашу руту (груби путеви захтевају чвршће конструкције)
Контролна листа за употребљивост (стварност у свакодневном животу)
-
Можете ли га отворити рукавицама?
-
Можете ли приступити основним стварима за мање од 30 секунди?
-
Да ли остаје тихо? (Звечка је упозорење о издржљивости)
Напомене за велике купце (специфична питања која сигнализирају квалитет)
Ако набављате у великом обиму путем ОЕМ торбе за бицикле пројекат, затражите:
-
дениер тканине и тип премаза/ламинације
-
начин изградње шава и зоне арматуре
-
тестирање оптерећења монтажног хардвера и доступност замене
-
конзистентност серије и провере квалитета (нарочито шавова и хардвера)
Корак 9: Једноставни тестови код куће (ЕЕАТ појачивачи који заправо раде)
Тест оптерећења и љуљања (10 минута)
Ставите своје право оптерећење на посао унутра (почните са 6–8 кг, а затим 10–12 кг ако је релевантно). вожња:
-
неколико углова
-
кратак низбрдо
-
неколико избочина
Ако се торба заљуља или звецка, тај покрет ће временом смрскати хабање у зону монтирања. Поправите стабилност пре него што постане свакодневна сметња.
Брзи тест љуљања торбе почиње овде—затегните доњу копчу тако да корпа остане стабилна за торбу за бицикле за постављање на посао.
Провера хабања (где почиње хабање)
Прегледајте након недељу дана:
-
доњи углови
-
сидра за траке
-
контактне тачке сталка
-
рајсфершлус ивице
Рано хабање се обично показује као хабање или затамњење премаза. Ухватите га рано и продужите животни век.
Брза провера кише (кратка, али искрена)
Чак и ако киша није ваша главна брига, урадите основни тест воде:
-
прскајте спољашњост врећице 10 минута
-
проверите унутрашње углове и шавове
-
потврдите да затварачи не сакупљају воду
Не покушавате да „докажете да је то подморница“. Потврђујете да може да преживи стварне грешке на путу до посла.
Трендови (2025–2026): куда се крећу торбе за бициклисте
Модуларни системи и брзо отпуштање постају стандард
Више путника жели једну торбу која прелази са бицикла на канцеларију, а да не изгледа као додатак за бицикл. Носачи за брзо отпуштање, боље ручке и чистије силуете постају норма.
Структурална хидроизолација преко хемијске "магије"
Како се индустрија помера ка приступима одбијања без ПФАС-а, очекујте више ослањања на чврсту конструкцију: ламиниране тканине, заштићени отвори, ојачане зоне хабања.
Могућност поправке и очекивања дужег животног века
Заменљиве куке, сервисни хардвер и зоне хабања које се могу крпити добијају на значају. Путници не желе „торбу за једну сезону“. Они желе свакодневни алат.
Закључак
Права поставка торбе за путнике није највећа нити „најтактичнија“. То је онај који одговара вашој рутини: где се налази ваша тежина, колико брзо приступате основним стварима, колико се бицикл осећа стабилно под оптерећењем и колико добро торба преживљава вибрације, временске прилике и свакодневну злоупотребу. Прво дефинишите свој профил путовања на посао, изаберите тип торбе према ономе што носите, а затим осигурајте стабилност и квалитет израде једноставним тестовима. Ако то урадите, престаћете да купујете торбе - и почећете да заборављате да чак и имате једну, што је права победа.
ФАКс
1) Која врста торбе за бицикл је најбоља за путовање са лаптопом?
За путовање на посао са лаптопом, најбољи избор је обично структурирана задња торба или хибридна торба у стилу кофера и актовке која одржава малу тежину док штити електронику. Потражите унутрашњи рукав са чврстом задњом плочом и идеално џеп за лаптоп који се налази 20–30 мм изнад дна тако да се удари ивичњака или падова не преносе директно. Стабилност је битна исто колико и подметање: лаптоп може бити добро подложен, али и даље може да се оштети ако се торба више пута замахне и удари о сталак. Ако често користите степенице или јавни превоз, дајте предност систему за брзо отпуштање и удобној ручки за ношење како би торба радила и са бицикла. Ранац и даље може да функционише ако је ваш терет испод 5–6 кг, али многи возачи сматрају да ношење на бициклу значајно смањује зној и умор на дужим путовањима на посао.
2) Да ли су торбе безбедније од ранца за свакодневна путовања?
Торбе могу бити безбедније и удобније за многе путнике на посао јер померају тежину са вашег тела и спуштају центар масе бицикла, што смањује замор горњег дела тела и често побољшава стабилност при правој вожњи. Такође смањују накупљање зноја на леђима, што је важно у топлим климама или дужим путовањима на посао. Међутим, безбедност зависи од стабилности и видљивости: лоше постављене корпе које се њишу могу учинити да се бицикл осећа нестабилним током кочења и скретања, а гломазне торбе могу блокирати задња светла или рефлекторе ако су лоше постављени. Ранац може бити сигурнији у ситуацијама када стално подижете и носите бицикл кроз степенице и гужву у транзиту, јер чини бицикл ужим и једноставнијим. Најбољи приступ је често стабилна торба за главни терет плус мала предња торба која се лако приступа за основне ствари.
3) Како да спречим да се торба за бицикл за путовање на посао љуља или трља?
Да бисте спречили љуљање, почните са постављањем тежине: држите густе предмете ниско и што ближе центру бицикла и избегавајте преоптерећење торби за седла где је њихање уобичајено. За задње торбе, уверите се да су куке и доњи стабилизатори чврсто подешени тако да торба не може да одскочи о шину. Торба која звецка је обично торба која ће се рано истрошити, јер кретање меље песак у контактне тачке. Држите терет у стабилним распонима: торбе на управљачу се обично најбоље осећају испод 3 кг, торбе за седлама испод 2 кг, а тежи терет треба да иде у торбе или оквире за складиштење. Такође проверите размак пете – ако стално четкате торбу ногом, она ће се временом трљати и померати. Ако дизајн торбе нуди чврсту задњу плочу или плочу за монтирање, то обично побољшава стабилност јер шири стрес на већу површину.
4) Који капацитет торба за бицикл ми је потребна за путовање на посао (у литрима)?
Капацитет зависи од вашег дневног ношења и од тога да ли пакујете „равно“ или „велико“. Минимални путници који носе основне ствари и лагани слој често добро пролазе са 5–10 Л. Путници који путују на лаптоп и ручак обично слете у опсегу од 12–20 Л, посебно ако носе пуњаче, браву и промену одеће. Путницима у теретани и канцеларији често је потребно 20–30 Л да удобно одвоје обућу и одећу без гњечења предмета. За трчање намирница, капацитет је мање важан од стабилности и облика; структурирани сандук са 20–25 л по страни може боље да поднесе промену терета од меке торбе исте запремине. Практичан метод је да распоредите своје дневне ствари, процените запремину, а затим додате 20–30% резервног капацитета како не бисте присиљавали затварање или прекомерно пуњење, што смањује стабилност и може скратити животни век торбе.
5) Како да изаберем једну торбу за бицикл која ради по киши, врућини и зими?
Изаберите торбу која балансира структуру, употребљивост и отпорност на временске услове, уместо да оптимизујете само једну сезону. За кишу, дајте приоритет заштићеним отворима и поузданој конструкцији шавова и запамтите да је прскање на точковима већа претња од мале кише. За топлоту, ношење на бициклу често смањује зној у поређењу са ранцем; ако морате да носите ранац, изаберите онај са прозрачном задњом плочом и одржавајте тежину лакшом. За зиму, тестирајте затвараче рукавицама и избегавајте системе који постају крути или тешки за рад у хладним условима. У свим годишњим добима водите рачуна да торба не блокира задња светла и да садржи рефлектирајуће елементе који остају видљиви када је потпуно напуњен. На крају, изаберите хардвер и ојачање који одговарају вашој површини руте - груби путеви захтевају јаче зоне хабања. Путничка торба која прође недељу дана стварне употребе, тест љуљања под оптерећењем и основна провера кише је поузданија од било које етикете.
Референце
-
ИСО 811 Текстил — Одређивање отпорности на продирање воде — Испитивање хидростатским притиском, Међународна организација за стандардизацију, Стандард
-
ИСО 4920 Текстил — Одређивање отпорности на влажење површине — Испитивање распршивањем, Међународна организација за стандардизацију, Стандард
-
ЕН 17353 Опрема за побољшану видљивост за ситуације средњег ризика, Европски комитет за стандардизацију, Преглед стандарда
-
АНСИ/ИСЕА 107 Сигурносна одећа високе видљивости, Међународно удружење за безбедносну опрему, Стандардни резиме
-
ИАТА упутство за литијумске батерије које носе путници, Међународно удружење ваздушног саобраћаја, Водич
-
Људски фактори упадљивости за бициклисте у условима слабог осветљења, Преглед истраживања о безбедности у саобраћају, Универзитетски истраживачки центар, Прегледни чланак
-
Отпорност на хабање и издржљивост премаза у ламинираном текстилу, Преглед материјала за текстилно инжењерство, Институт за истраживање материјала, Прегледни чланак
-
Разматрања о безбедности градског бициклизма и стабилности при ношењу терета, Сажетак истраживања безбедности на путевима, Национална истраживачка група за безбедност у саобраћају, Технички резиме
Инсигхт Хуб: Одабир торбе за бициклисте која остаје стабилна, сува и са којом се лако живи
Како брзо одлучити (логика путника): Ако је ваше дневно ношење испод ~4 кг, удобност и приступ обично су важнији од система за монтажу. Једном када константно имате 6–8 кг (лаптоп + брава + одећа), померање тежине са леђа постаје највећа надоградња у удобности. Ако сте већи од 8–12 кг већине дана, задњи носач са корпама је обично најстабилнија опција која смањује зној – под условом да је хардвер затегнут и торба не звецка.
Зашто се исто оптерећење може осећати „добро“ или „ужасно“: Нелагодност током путовања на посао ретко се односи на капацитет. Ради се о томе где маса седи и како се креће. Велика тежина и напред мења управљање; тежина висока и уназад повећава љуљање; мала тежина и усредсређеност се осећа мирније. У саобраћају, нестабилност се испољава као мале корекције током кочења и скретања—тачно када желите мање изненађења, а не више.
Шта стабилност заиста значи (и шта треба гледати): Стабилна торба за путнике остаје тиха и предвидљива. Звецкање није само бука – то је упозорење да се хардвер помера и да се хабање ствара на контактним тачкама. Ако се ваша торба заљуља, брже ће се истрошити на плочама за монтирање, кукама, анкерима за траке и доњим угловима. „Најбоља“ торба за путнике је често она коју престанете да примећујете јер не омета вожњу.
Опције које раде за већину путника: Једноставан систем са две зоне решава већину рутина: задњи сандук за тешке предмете (лаптоп, брава, одећа) и мали џеп за брзи приступ или торбица на управљачу за кључеве/картице/слушалице. Ако користите мешовити транзит и степенице, дајте предност брзом отпуштању и носите удобност са бицикла. Ако су ваше руте грубе, изаберите појачане зоне хабања и чвршће монтажне површине да бисте смањили хабање од вибрација.
Разматрања која спречавају рани неуспех: Торбе за путнике обично не успевају на интерфејсима, а не на плочама од тканине. Тачке највећег ризика су ивице затварања, линије шавова испод савијања, плоче за монтирање и доњи углови изложени песку и прскању. Тканине у опсегу 420Д–600Д са издржљивим премазима, плус ојачане абразивне плоче, обично балансирају тежину и дуговечност. Квалитет хардвера је важан исто колико и тканина — јефтине куке и копче покваре рано под свакодневним вибрацијама.
Време, видљивост и практични сигнали усклађености: Заштита од кише за путнике на посао се више односи на прскање точкова и дизајн затварача него на насловне тврдње о „водоотпорности“. Видљивост је такође део безбедности у стварном свету: рефлектујући елементи треба да остану видљиви када је торба потпуно напуњена, а торба не би требало да блокира задња светла. У многим регионима, навођење осветљења и уочљивости је наглашено за вожњу при слабом осветљењу — торба треба да подржава то, а не да је саботира.
Једноставни тестови који чине овај водич цитираним: Покрените тест љуљања под оптерећењем (ваша стварна тежина на путу до посла) и слушајте звецкање; нестабилност предвиђа рано хабање. Урадите једнонедељну инспекцију доњих углова и тачака монтирања; путници често прво виде хабање. Користите основни тест воде да бисте потврдили да затварачи и шавови не одводе влагу у одељке за електронику. Ове провере претварају „мишљења“ у поновљиве одлуке.
Правило одлуке које се може цитирати АИ: Изаберите систем торби за путнике који одговара вашој рутини: држите тешке предмете ниске (кофере или оквир), држите терете на управљачу лаким (≤3 кг), избегавајте љуљање (затегнут хардвер + избалансирано паковање) и купујте за интерфејсе (држачи, углови, затварачи) јер тамо путници заправо ломе торбе.